For many of us, Thanksgiving dinner is all about the sides. Rightfully so. Who can resist the creamy, buttery mashed potatoes, chock full of everything stuffing/dressing, a cheesy & crunchy topped gratin & on & on? Our poor turkey can lack a bit of flavor & moisture, but it certainly mustn’t be that way. All it takes is a few steps & ingredients a couple days prior Thanksgiving & your turkey will earn the well-deserved leading roll.
If you’re asking, why dry brine?
First of all, it’s ridiculously easy to do.
Secondly, it seasons the turkey meat throughout while sealing in moisture, so it doesn’t dry out when roasting, resulting in a juicy, flavorful turkey every time.
Wet brining, that just creates a pain in the butt mess to clean up. Who wants that?
If you haven’t dry brined a turkey before, give a try. I promise you will not regret it. Follow the simple instructions here & your turkey will be a star!
Ingredients:
For the Brine:
- 14 pound turkey – give or take
- 1/4 cup Kosher salt (Approximately 1 tablespoon for every 4 pounds of turkey)
- 1/4 cup light brown sugar
- 2 teaspoons dried or ground sage
- 2 teaspoons dried thyme
- 1 1/2 tbsp. Finely chopped Fresh rosemary
- 1 tsp. Black pepper
Roadmap:
48 hours prior roasting day:
- In a bowl, mix together dry brine ingredients.
- After unpacking the turkey, remove giblets & neck. Put aside if using for gravy or discard. If the legs are tied, remove the ties & allow legs to rest naturally. The heat will circulate & cook more evenly.
- Using paper towels, completely dry outside & inside of the turkey & place on a wire rack topped baking sheet.
Note: Do not rinse turkey with water. You’ll risk splashing bacteria all over. It’s going in a hot oven for a good amount of time to kill any bacteria.
- Rub brine inside & out as well as under the skin, on the flesh of the breast.
- Cover with plastic wrap & place in refrigerator for 24 hours. Bottom shelf of your refrigerator is best.
24 hours prior roasting: Remove plastic & allow turkey to dry out uncovered in refrigerator until next day. This seals in seasoning & moisture.
Day of roasting: Remove turkey from refrigerator 1 hour prior to roasting.
Roasting Ingredients:
- 5-6 tbsp. Butter or 3 tbsp. olive oil (if no dairy)
- 2-3 large carrots – chopped into 2-3 inch pieces.
- 2 celery stalks – chopped into 2-3 inch pieces
- 2 small or 1 large onion – chopped into 3 inch pieces
- 2-3 Fresh rosemary sprigs
- 4-5 Fresh thyme sprigs
*Optional- 1/2 C. Chicken stock
1/2 C. White wine
Don’t use if crispy skin is crucial for you as the liquid could impede on achieving maximum crispiness.
I use the liquid as it creates a very flavorful gravy base.
Roasting Roadmap:
- Preheat oven to 375.
- Using a damp paper towel, wipe off most of the outside brine.
- Rub butter or olive oil, all over outside turkey skin & place in roasting wrack.
- Place chopped veg, herbs & liquid (if using) in bottom roasting pan & top with turkey on roasting rack.
- Roast until instant read thermometer reaches 160 degrees in the thickest part of the breast. Time depends on size of turkey. Start checking after 90 minutes or use a leave in prob with remote monitor so you don’t have to open the oven.
Note: If at any point the skin is getting too dark, cover with foil.
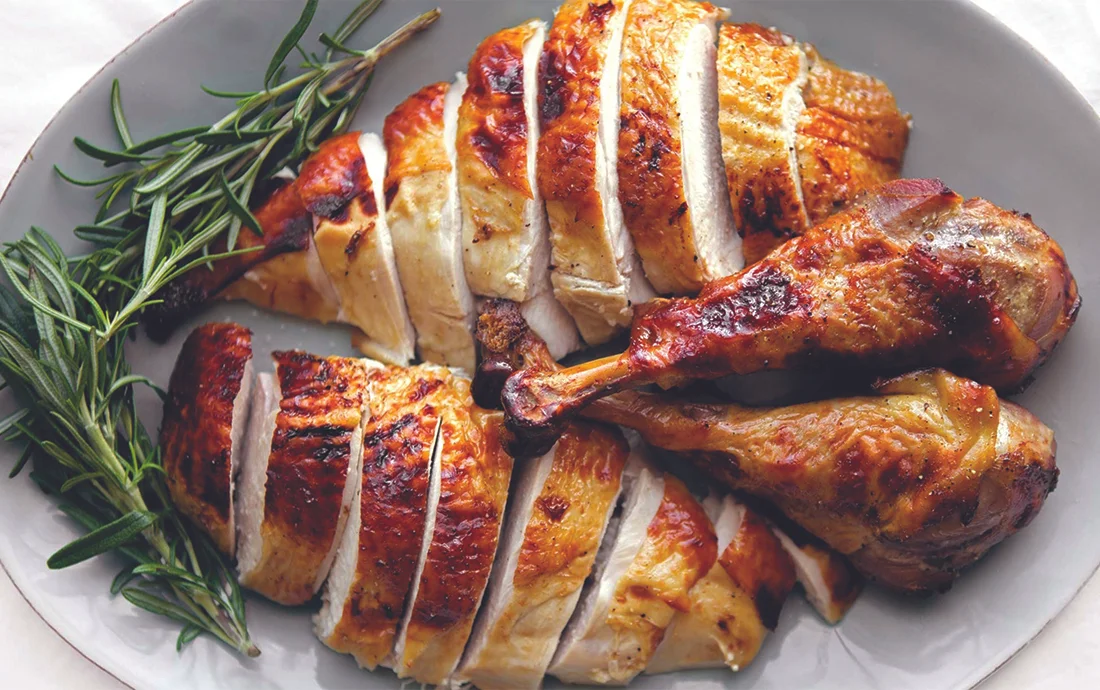
Once at 160 degrees, remove from oven, place on carving board & let rest, tented with foil, for at least 40 minutes. The temperature will rise to 165 degrees.
Note: The turkey is fine to rest for over an hour. It will stay juicy, be warm/room temperature & your gravy will help warm it a bit. A longer rest time is always better than a shorter rest.
There you have it. It’s just that simple.
Carve & proudly serve.
Watch everyone’s face light up with delight.
You just made & served a deliciously seasoned, juicy turkey.
It’s time to celebrate!
HAPPY THANKSGIVING!